Hyundai Tucson: Transfer Assembly- Removal
Removal
A Type
- Remove the engine room under cover.
(Refer to Engine Mechanical System - "Engine Room Under Cover")
- Remove the front driveshaft assembly. Right side
(Refer to Driveshaft and Axle - "Front Driveshaft")
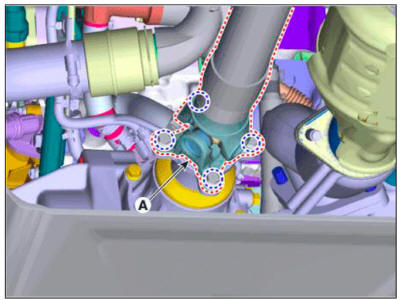
- Remove the front propeller shaft assembly (A) from the transfer assembly.
Tightening torque : 49.0 - 68.6 N.m (5.0 - 7.0 kgf.m, 36.2 - 50.6 lb-ft)
- Remove the transfer case assembly.
(1) Loosen the transafer assembly upper mounting bolts (A).
Tightening torque : 60.8 - 65.7 N.m (6.2 - 6.7 kgf.m. 44.8 - 48.5 lb-ft)

(2) Loosen the lower mounting bolts (A) and then removing the transfer case assembly (B).
Tightening torque : 60.8 - 65.7 N.m (6.2 - 6.7 kgf.m. 44.8 - 48.5 lb-ft)

B Type
- Remove the engine room under cover.
(Refer to Engine Mechanical System - "Engine Room Under Cover")
- Remove the front drive shaft assembly. Right side
(Refer to Driveshaft and Axle - "Front Driveshaft")
- Remove the front propeller shaft assembly (A) from the transfer assembly.
Tightening torque : 49.0 - 68.6 N.m (5.0 - 7.0 kgf.m, 36.2 - 50.6 lb-ft)

- Remove the transfer case assembly.
(1) Loosen the transafer assembly upper mounting bolts (A).
Tightening torque : 60.8 - 65.7 N.m (6.2 - 6.7 kgf.m. 44.8 - 48.5 lb-ft)

(2) Loosen the lower mounting bolts (A) and then removing the transfer case assembly (B).
Tightening torque : 60.8 - 65.7 N.m (6.2 - 6.7 kgf.m. 44.8 - 48.5 lb-ft)

READ NEXT:
 Transfer Assembly- Installation
To install, reverse the removal procedures.
WARNING
Be careful not to damage the O-ring (A). If the O-ring is
damaged, replace with a new one.
Smear and cover splines (B) with molybdenum type high pressure
grease.
GREASE SPL-1 eq
Driveshaft side oil seal # 1 B Type
Remove the transfer assembly.
(Refer to 4 Wheel Drive (4WD) System - "Front Wheel Transfer Assembly")
Remove the dust cover (A).
Remove the oil seal #1 (A).
Install the oil seal #1 (A) with a new one by using t
Driveshaft side oil seal #2 B Type
Remove the transfer assembly.
(Refer to 4 Wheel Drive (4WD) System - "Front Wheel Transfer Assembly")
Remove the dust cover (A).
Remove the oil seal #2 (A).
Install the oil seal #2 (A) with a new one by using t
SEE MORE:
Differential gear assembly
Remove the drain plug packing (A) and drain plug (B) to drain the gear
oil.
Loosen the differential side cover mounting bolts.
Widen the gap between the side cover and the case to remove the side
cover (A).
Remo
High Pressure Fuel Line- Removal
WARNING
In case of removing the high pressure fuel pump, high pressure fuel
pipe, delivery pipe, and injector,
there may be injury caused by leakage of the high pressure fuel. So don't do any
repair work right after
engine stops.
Relea
Information
- Home
- Hyundai Tucson - Fourth generation (NX4) - (2020-2023) - Owner's Manual
- Hyundai Tucson - Fourth generation (NX4) - (2020-2023) - Workshop Manual
