Hyundai Tucson: Rear Door - Glass Adjustment
Hyundai Tucson - Fourth generation (NX4) - (2020-2023) - Workshop Manual / Body (Interior and Exterior) / Rear Door / Rear Door - Glass Adjustment
WARNING
Check the glass run channel for damage or deterioration, and replace them if necessary.
- Remove the rear door trim.
(Refer to Rear Door - "Rear Door Trim")
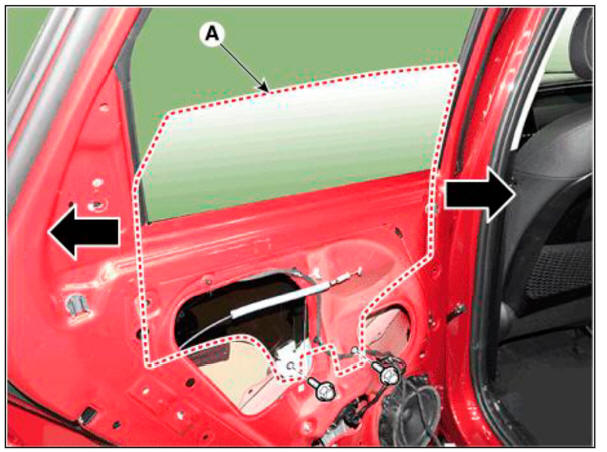
- Lower the glass by operating the power window switch until the glass mounting bolt is exposed in the plug hole.
WARNING
Be careful not to drop the glass and/or scratch the glass surface.
- After loosening the glass mounting bolts, adjust the spacing of the glass (A) by moving the glass from side to side and then tighten the bolts.
- Check the glass for normal operation.
Door Striker Adjustment
- After loosening the mounting screw, adjust the striker (A) by moving it forward and backward or from side to side and then tighten the bolts (B).
Tightening torque : (B) : 16.7 - 25.5 N.m (1.7 - 2.6 kgf.m, 12.3 - 18.8 lb-ft)

- Tap on the striker with a plastic hammer to adjust the striker. The striker will not move much, but will give some adjustment.
- Hold the outer handle out, and push the door against the body to make sure that the striker fits flush with the body. If the door latches properly, tighten the screws and recheck.
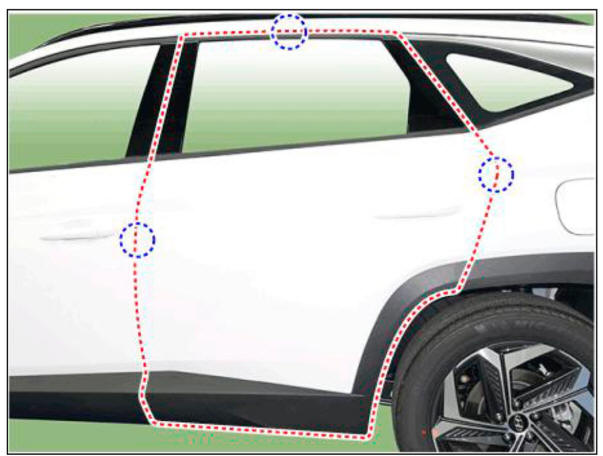
Door Position Adjustment
- Check that the door and body edges are parallel.
- Place the vehicle on a level surface before adjusting the doors.
- Adjust the hinges (A) :
- Loosen the door mounting bolts slightly, and move the door in or out until it flush with the body.
- Loosen the hinge mounting bolts slightly, and move the door backward or forward, up or down as necessary.
- Place a shop towel on the jack to prevent damage to the door when adjusting the door.
Tightening torque :
(B) : 23.5 - 31.4 N.m (2.4 - 3.2 kgf.m, 17.4 - 23.1 lb-ft)
(C) : 9.8 - 19.6 N.m (1.0 - 2.0 kgf.m, 7.2 - 14.5 lb-ft)

- Grease the pivot portions of the hinges indicated by the arrows.
- Check for water leaks.
READ NEXT:
 Rear door trim
Component Location
Rear door trim
Replacement
WARNING
When removing with a flat - tip screwdriver or remover, wrap
protective tape around the tools
to prevent damage to components.
Put on gloves to prevent hand injuries.
Rear door trim - Removal
Remove the rear door trim.
(Refer to Rear Door - "Rear Door Trim")
After loosening the mounting screws, remove the rear door inside handle
(A).
To install, reverse removal procedure.
WARNING
Make sure the door locks
Rear door window glass
Component Location
Rear door window glass
Replacement
WARNING
When removing with a flat-tip screwdriver or remover, wrap
protective tape around the tools to prevent
damage to components.
Put on gloves to prevent hand injuries.
SEE MORE:
Trip computer (Type A)
The trip computer is a microcomputercontrolled
driver information system that
displays information related to driving.
Information
Some driving information stored in the
trip computer (for example Average
Vehicle Speed) resets if the battery is
Fuses
A vehicle's electrical system is protected
from electrical overload damage by
fuses.
This vehicle has 5 fuse panels, one
located in the driver's side panel bolster,
the other in the engine compartment.
If any of your vehicle's lights,
Information
- Home
- Hyundai Tucson - Fourth generation (NX4) - (2020-2023) - Owner's Manual
- Hyundai Tucson - Fourth generation (NX4) - (2020-2023) - Workshop Manual
