Hyundai Tucson: When Using the CVVD fixture
- When installing the CVVD assembly mounting bolts (M6), tighten sequence shown.
Tightening torque : 1ST 4.9 - 6.9 N.m (0.5 - 0.7 kgf.m, 3.6 - 5.1 lb-ft)
2nd 9.8 - 11.8 N.m (1.0 - 1.2 kgf.m, 7.2 - 8.7 lb-ft)
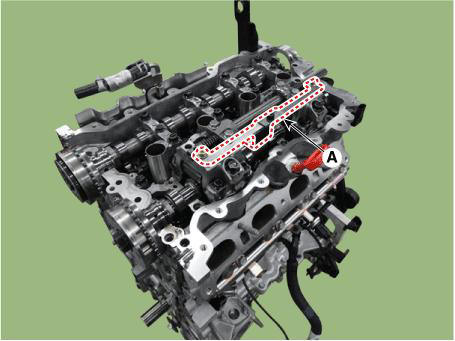
- Remove the CVVD fixture (A).
- Provisionally tighten the CVVD assembly mounting bolts (M8) in sequence shown below.
Tightening torque : 9.8 - 11.8 N.m (1.0 - 1.2 kgf.m, 7.2 - 8.7 lb-ft)
- Remove the CVVD assembly mounting bolts (M6) (A).
- Provisionally tighten the CVVD assembly mounting bolts (M6) in sequence shown below.
Tightening torque : 4.9 - 6.9 N.m (0.5 - 0.7 kgf.m, 3.6 - 5.1 lb-ft)

- Tighten the CVVD assembly mounting bolts (M8) in sequence shown below.
Tightening torque : 18.6 - 22.6 N.m (1.9 - 2.3 kgf.m, 13.7 - 16.6 lb-ft)

- Tighten the CVVD assembly mounting bolts (M6) in sequence shown below.
Tightening torque : 9.8 - 11.8 N.m (1.0 - 1.2 kgf.m, 7.2 - 8.7 lb-ft)

- Measure the clearance between the control shaft bearing cap and the end of control shaft using a clearance gauge.
Clearance : 0.0 - 0.05 mm (0.0 - 0.002 in.)

When not using the CVVD fixture
Provisionally tighten the CVVD assembly mounting bolts (M6) in sequence shown below
Tightening torque : 4.9 - 6.9 N.m (0.5 - 0.7 kgf.m, 3.6 - 5.1 lb-ft)

- Provisionally tighten the CVVD assembly mounting bolts (M8) in sequence shown below.
Tightening torque : 9.8 - 11.8 N.m (1.0 - 1.2 kgf.m, 7.2 - 8.7 lb-ft)
- Tighten the CVVD assembly mounting bolts (M8) in sequence shown below.
Tightening torque : 18.6 - 22.6 N.m (1.9 - 2.3 kgf.m, 13.7 - 16.6 lb-ft)

- Tighten the CVVD assembly mounting bolts (M6) in sequence shown below.
Tightening torque : 9.8 - 11.8 N.m (1.0 - 1.2 kgf.m, 7.2 - 8.7 lb-ft)

- Release the torque of control shaft bearing cap bolt (A).
- Push the control shaft bearing cap as close as possible in the direction of the arrow
- Install the control shaft bearing cap mounting bolts (A).
Tightening torque : 9.8 - 11.8 N.m (1.0 - 1.2 kgf.m, 7.2 - 8.7 lb-ft)

- Measure the clearance between the control shaft bearing cap and the end of control shaft using a clearance gauge.
Clearance : 0.0 - 0.05 mm (0.0 - 0.002 in.)
- Install the intake OCV & center bolt (A).
Tightening torque : 22.6 - 26.5 N.m (2.3 - 2.7 kgf.m, 16.6 - 19.5 lb-ft) + 32 - 36º

WARNING
- To prevent impurities from entering intake oil control valve (OCV) & center bolt, wear rubber gloves.
- Intake oil control valve (OCV) and center bolt, hold the
hexagonal portion on the camshaft with a wrench
to prevent the camshaft from rotating.
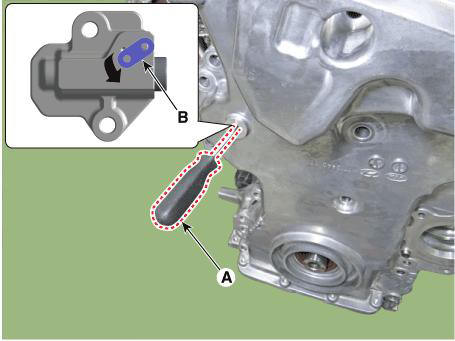
- Compress the timing chain tensioner piston.
(1) With a pry bar (A), compress the timing chain tensioner piston (B).

(2) With a thin gimlet (A), raise the ratchet plate (B) of the timing chain tensioner and fix the piston.

WARNING
Do not remove the pick (A).
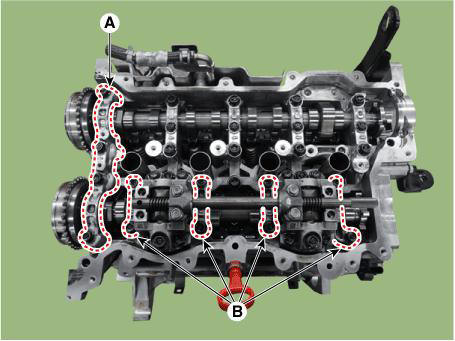
- Install the front bearing cap and camshaft bearing cap
WARNING
If there is enough engine oil on the camshaft front bearing cap and camshaft bearing cap installing bolt and bolt hole, tighten to the minimum required tightening torque.
Apply engine oil the upper part of the intake / exhaust camshaft journal, then install the camshaft front bearing cap and camshaft bearing cap. The amount of application should be enough to flow down both the front and back sides when it is applied to the center.
(1) Install the front bearing cap (A) and intake camshaft bearing cap (B).
- Remove the fine gimlets (A) that hold the timing chain tensioner.
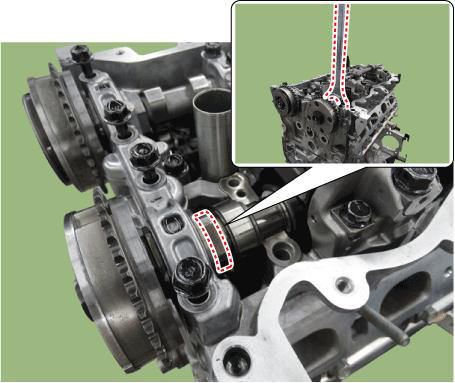
- When installing the timing chain, be sure that the timing mark (A) of each sprocket is matched with the timing mark (B) (color link) of the timing chain.
READ NEXT:
 Intake/Exhaust CVVT Timing Mark
Intake CVVT Timing Mark
Exhaust CVVT Timing Mark
Install the cam to cam guide (A).
Tightening torque :
9.8 - 11.8 N.m (1.0 - 1.2 kgf.m, 7.2 - 8.7 lb-ft)
Install the intake variable force solenoid (VFS) valve (A).
Tightenin
Cylinder Head
Inspect for flatness.
Using a precision straight edge and feeler gauge, measure the contacting
surface of the cylinder block and the
manifolds for warpage
Flatness of cylinder head gasket surface:
Less than 0.05 mm (0.0020 in.) fo
Cylinder Head - Installation
WARNING
Thoroughly clean all parts to be assembled.
Always use a new cylinder head gasket and manifold gasket.
Always use a new cylinder head bolt and cylinder head bolt
washer.
The cylinder head and exhaust manifold is a metal gasket. T
SEE MORE:
Mode control actuator
Components Location
Mode control actuator
Inspection
Turn the ignition switch OFF.
Disconnect the mode control actuator connector.
Verify that the mode control actuator operates to the defrost mode when
connecting 12V to termina
Main Function
Static Braking Mode
The operation and the cancellation at the stop condition of the vehicle
(1) The operation condition: Pull the EPB switch irrespective of the brake
pedal pressed condition.
(Pull).
The Vehicle speed <= 3kph
(2
Information
- Home
- Hyundai Tucson - Fourth generation (NX4) - (2020-2023) - Owner's Manual
- Hyundai Tucson - Fourth generation (NX4) - (2020-2023) - Workshop Manual
