Hyundai Tucson: Tail Gate Window Glass - Removal
Hyundai Tucson - Fourth generation (NX4) - (2020-2023) - Workshop Manual / Body (Interior and Exterior) / Tail Gate Window Glass / Tail Gate Window Glass - Removal

Removal
WARNING
Put on gloves to prevent hand injuries.
WARNING
Use seat covers to avoid damaging any surfaces.
- Remove the tailgate trim.
(Refer to Tail Gate - "Tail Gate Trim")
- Remove the rear spoiler.
(Refer to Body Side Molding - "Rear Spoiler")
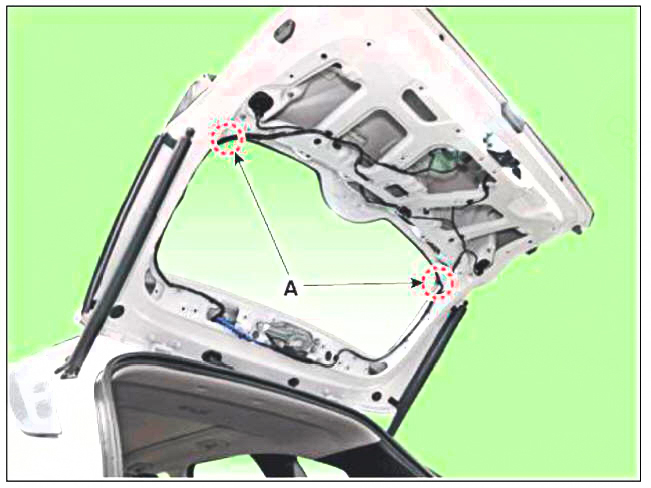
- Disconnect the hot wire connector (A).

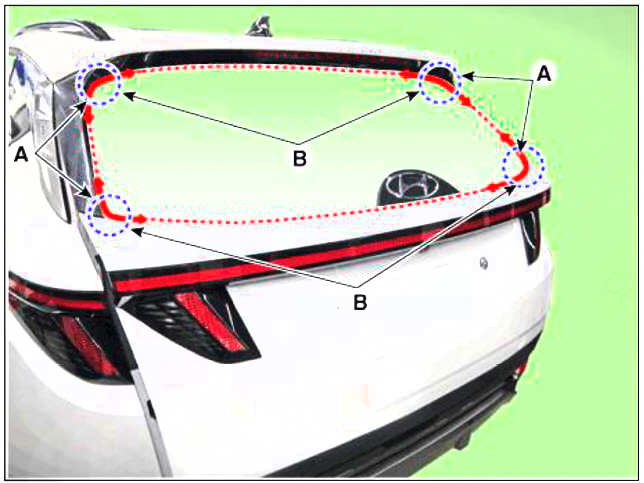
- Cut off the sealant on the edge (B) while pulling the piano wire (A) to the left and right.
WARNING
- Put on gloves to protect your hands.
- Heat may occur when working on the wires. Be careful not to burn your hands.
- Be careful not to disconnect the piano wire.

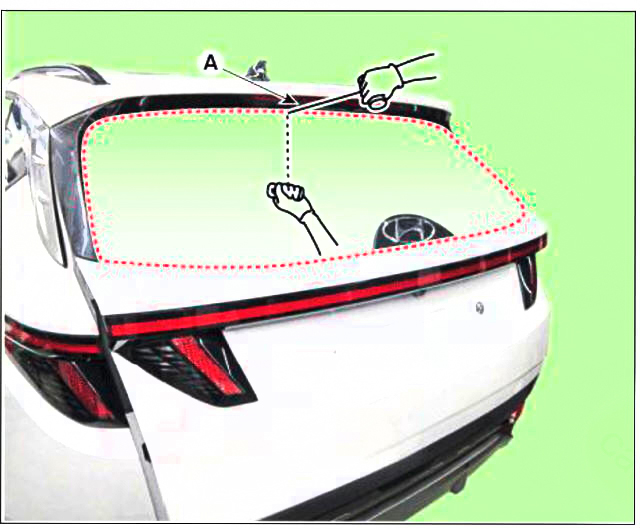
- Put in a piano wire (A) through the corner of the tailgate window glass and insert wire grips into both ends of the wire.

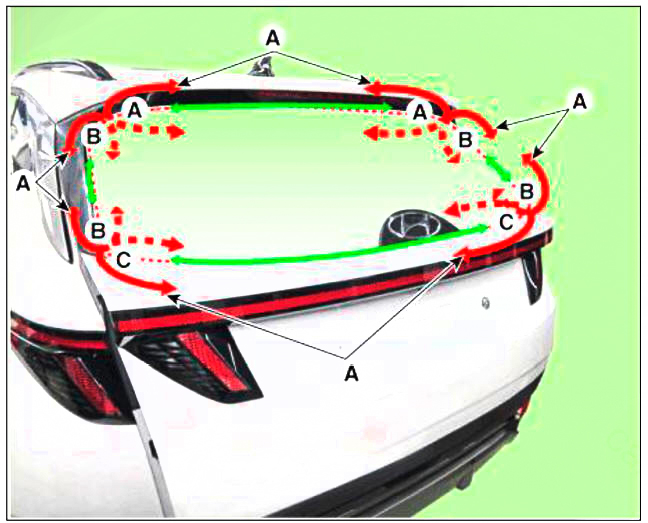
- Cut off the sealant on (A-A), (B-B), (C-C), while pulling a piano wire (A) to the left and right.
WARNING
- Put on gloves to protect your hands.
- Heat may occur when working on the wires. Be careful not to burn your hands.
- Be careful not to disconnect the piano wire.

- Remove the tailgate window glass (A).

READ NEXT:
 Tail Gate Window Glass - Installtion
Using a cutting knife (A), remove the remaining sealant (B) on the body
panel.
Apply the body primer to the bonding surface of body panel.
WARNING
Be careful not to touch the surface covered with the primer
because touching
 Quarter Fixed Glass
Components
Quarter fixed glass
Removal
WARNING
When removing with a flat-tip screwdriver or remover, wrap
protective tape around the tools to prevent
damage to components.
Put on gloves to prevent hand injuries.
WARNING
Tak
 Floor Carpet
Replacement
WARNING
When removing with a flat-tip screwdriver or remover, wrap
protective tape around the tools to prevent damage to
components.
Put on gloves to prevent hand injuries.
WARNING
Take care not to bend or scratch the trim
SEE MORE:
 Front door latch
Component Location
Front door latch
Replacement
WARNING
When removing with a flat-tip screwdriver or remover, wrap
protective tape around the tools to prevent
damage to components.
Put on gloves to prevent hand injuries.
 Inside rear view mirror
Component Location
Inside rear view mirror
Replacement
WARNING
When removing with a flat-tip screwdriver or remover, wrap
protective tape around the tools to
prevent damage to components.
Put on gloves to prevent hand injuries.
Information
- Home
- Hyundai Tucson - Fourth generation (NX4) - (2020-2023) - Owner's Manual
- Hyundai Tucson - Fourth generation (NX4) - (2020-2023) - Workshop Manual