Hyundai Tucson: Timing System - Installation
- Keep the liquid gasket sealing surfaces (timing chain cover, cylinder head, cam carrier, cylinder block, lower crankcase) free from foreign matters, cured sealant, oil, dust, moisture and etc. Spray the cleaner on the sealing surface and wipe it off with a clean cloth.
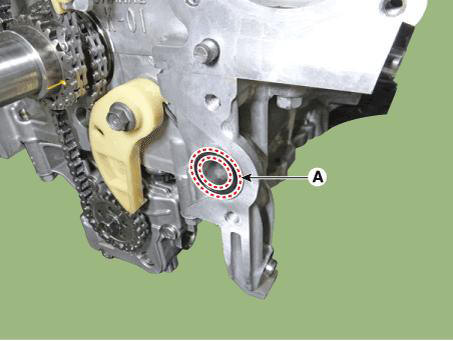
- Install the new O-ring (A).
- Install the timing chain cover.
(1) Keep the liquid gasket sealing surfaces (cam carrier, cylinder head, cylinder block, lower crankcase) free from foreign matters, cured sealant, oil, dust, moisture and etc. Spray the cleaner on the sealing surface and wipe it off with a clean cloth.
(2) Apply liquid gasket sealant to an interface between cam carrier, cylinder head, cylinder block and lower crankcase.
Width : Ø 3.0 - 5.0 mm (0.1181 - 0.1969 in.)
Specification : MS721-40AA or AAO

(3) Apply liquid sealant on timing chain cover. Then, assemble the part within 5 minutes of applying sealant.
Width / Specification
Whole section : Ø 2.5 - 3.5 mm (0.0984 - 0.1378 in) / MS721-40AA or AAO
Section A : Ø 1.5 - 2.5 mm (0.0591 - 0.0984 in) / MS721-40CC
Section B : Ø 3.5 - 4.5 mm (0.1378 - 0.1772 in) / MS721-40AA or AAO

(4) The dowel pins on the cylinder block and holes on the timing chain cover should be used as a reference for assembling the timing chain cover to the exact position.
Tightening torque
Bolt (A, B, C, D) : 18.6 - 23.5 N.m (1.9 - 2.4 kgf.m, 13.7 - 17.4 lb-ft)
Bolt (E, F) : 39.2 - 44.1 N.m (4.0 - 4.5 kgf.m, 28.9 - 32.5 lb-ft)

WARNING
The firing and / or blow out test should not be performed within 30 minutes of assembling the timing chain cover.
- Replace the front oil seal.
(Refer to Timing System - "Front Oil Seal")
- Install the other parts in the reverse order of removal.
- Refill engine with engine oil.
(Refer to Lubrication System - "Engine Oil")
- Fill with engine coolant.
(Refer to Cooling System - "Coolant")
WARNING
The coolant must be injected according to the integrated thermal management module (ITM) coolant filling method.
READ NEXT:
 Timing System -
Removal
Timing System -
Removal
Disconnect the battery negative terminal.
Turn the crankshaft damper pulley clockwise, and align its groove with
the timing mark of the timing chain
cover.
Remove the timing chain cover.
(Refer to Timing System - "Timing C
Timing System - Installation
Install the crankshaft sprocket (A).
Place the crankshaft key at the left 180º.
Install the oil pump chain.
(Refer to Lubrication System - "Oil Pump")
Install the timing chain (A).
WARNING
When inst
SEE MORE:
Boost Pressure Sensor (BPS)
Description
Boost pressure sensor (BPS) is installed on top of intercooler output pipe to
measures the pressure of
supercharged air in the turbocharger.
Specification
Circuit Diagram
Harness Connector
Inspection
Connect th
Driving Convenience
CRUISE CONTROL (CC) (IF EQUIPPED)
Cruise indicator
Set speed
Cruise Control will allow you to drive at
speeds above 20 mph (30 km/h) without
depressing the accelerator pedal.
Cruise Control (CC)
Cruise Control Operation
Operating c
Information
- Home
- Hyundai Tucson - Fourth generation (NX4) - (2020-2023) - Owner's Manual
- Hyundai Tucson - Fourth generation (NX4) - (2020-2023) - Workshop Manual
