Hyundai Tucson: Motor Driven Power Steering- Replacement
Replacement
- Turn the steering wheel so that the front wheels are placed in the straight ahead position.
- Turn the ignition switch OFF and disconnect the battery negative (-) cable.
- Remove the driver airbag (DAB).
(Refer to Restraint - "Driver Airbag (DAB) Module and Clock Spring")
- Remove the steering wheel.
(Refer to Steering System - "Steering wheel")
- Remove the clock spring.
(Refer to Restraint - "Driver Airbag (DAB) Module and Clock Spring")
- Remove the multifunction switch.
(Refer to Body Electrical System - "Multifunction switch")
- Remove the steering column shroud lower panel.
(Refer to Body - "Steering Column Shroud lower Panel")
- Remove the crash pad lower pannel.
(Refer to Body - "Crash Pad Lower Pannel")
- Remove the brake pedal.
(Refer to Brake System - "Brake Pedal")
- Disconnect the MDPS connector (A, B).
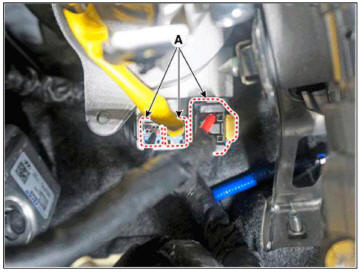
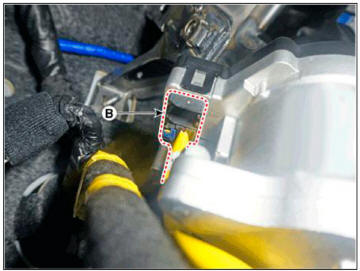
- Remove the steering column assembly after loosening the mounting nuts (A) and bolt (B).
Tightening torque
(A) : 25.0 - 29.4 N.m (2.5 - 3.0 kgf.m, 14.5 - 21.7 lb-ft)
(B): 53.9 - 58.8 N.m (5.5 - 6.0 kgf.m. 39.8 - 43.4 lb-ft)
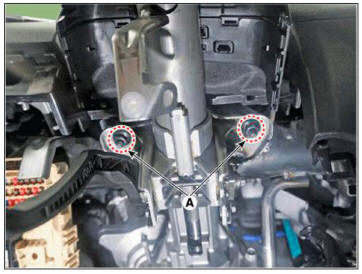
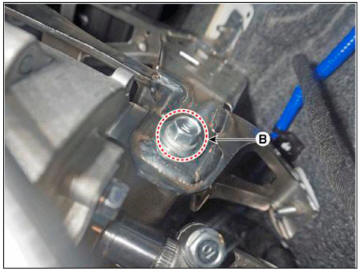
- Remove the MDPS power pack (A) after loosening the mounting bolts.
Tightening torque : 15.0-22.0 N.m (1.53 - 2.24 kgf.m. 11.1 - 16.2 lb-ft)
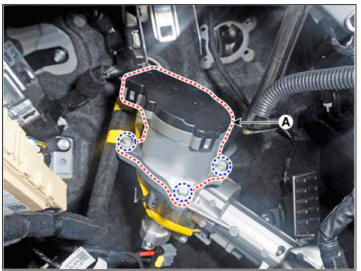
- Install a new power pack.
WARNING
When installing a new power pack, be sure to check whether the coupling is assembled before installing it.
- To install, reverse the removal procedures.
- Conduct the "EPS Type Recognition" by diagnostic tool.
(Refer to MDPS PowerPack Assembly - "Diagnosis with diagnostic tool")
- Conduct the "ASP Calibration" by diagnostic tool.
(Refer to MDPS PowerPack Assembly - "Diagnosis with diagnostic tool")
- Check the DTC.
Diagnosis with diagnostic tool
READ NEXT:
 EPS Type Recognition
WARNING
When missing the EPS Type Recognition, occure a problem with motor
driven power steering performance
EPS Type Recognition procedures
Connect self-diagnosis connector(16pins) located in the lower of driver
side crash pad to self-dia
 Motor Driven Power Steering - Removal and installation
WARNING
When lifting a vehicle using a lift, be careful not to damage the
lower parts of the vehicle (floor under cover, fuel filter, fuel
tank, canister).
(Refer to General Information - "Lift Point")
Loosen the front wheel nuts
 Tie rod end
Remove the tie rod end after loosening the nut.
Tightening torque :
49.0 - 53.9 N.m (5.0 - 5.5 kgf.m, 36.2 - 39.8 lb-ft)
WARNING
Before removing the tie rod end, note by measuring the length of the
thread or marked with paint.
Repl
SEE MORE:
 Front Bumper - Replacement
Components
Front bumper assembly
Front bumper side bracket
Component Location
Front bumper assembly
Replacement
WARNING
When removing with a flat-tip screwdriver or remover, wrap
protective tape around the tools to
p
 Front seat shield inner cover/ Front seat back cover
Component Location
Front seat shield inner cover
Replacement
WARNING
When removing with a flat-tip screwdriver or remover, wrap
protective tape around the tools to
prevent damage to components.
Put on gloves to prevent hand inj
Information
- Home
- Hyundai Tucson - Fourth generation (NX4) - (2020-2023) - Owner's Manual
- Hyundai Tucson - Fourth generation (NX4) - (2020-2023) - Workshop Manual